Showing posts with label DIY. Show all posts

Friday, May 10, 2013

Special Dates Sign

In the last couple of weeks, our tiny apartment has seen quite a bit of reformation! Let me just say--hallelujah the paneling is gone!  But more to come on that later.

As a result of the changes and the Spring cleaning I tackled, I've felt inspired to finally decorate my living room incorporating colors and ideas that I've been thinking about for quite awhile now.  You've already seen the pillows I made for my couch.  I also bought some new curtains (pictures soon!).  However, there was the issue of this big blank wall behind our couch and what to put there!

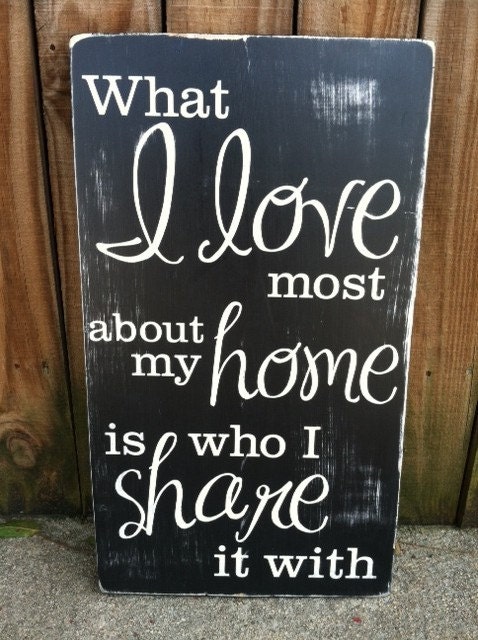
For awhile now, I've been loving date signs such as these:


Now, I've already chosen what I want to hang on this big, blank wall--and I thought a sign like this would definitely compliment the look.  But let me show you what I've chosen:

Isn't this bronze/brown letter R sweet?  I loved it as soon as I saw it at Hobby Lobby.  Thanks to a 40% off coupon, I was able to get it for $4.99!


Secondly, I ordered a photo canvas to hang alongside the R.  Can I just say I'm in love with photo canvases and have dreamed of getting one for a long time? I had some walmart gift cards saved from Christmas time, holding out for the perfect thing to spend them on.  When we got our wedding photos, I priced canvases and found out I can get this 16x20 size for only $4 out of pocket (after giftcards).  Um, yes please! 

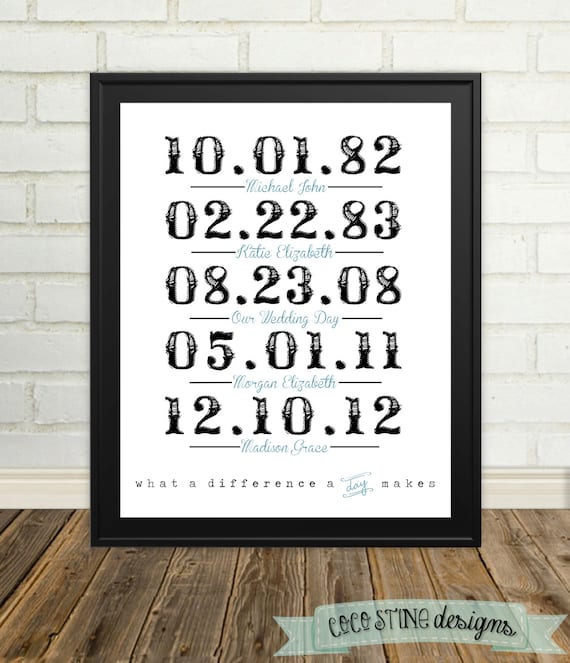
So anyways, back to the dates.  Don't you think it will look good hanging with the R and the Canvas above my couch? I thought so too.  

I played around on picmonkey (my new favorite site) and came up with this:

I'm so pleased with the design.  Although, I must say I had to print it three different times.  Ahem..first I got Devin's birthday and our engagement dates wrong.  The second time, I got our wedding date wrong.  Yeah...  But anyways, the third time's a charm, right?

To keep everything symmetrical, I wanted to fit this into a 5x7 frame.  I know its a little on the small side, but I didn't want it overpowering anything else.  Here's what it looks like after I popped it in the frame:


What do you think?  I'm picking up my canvas this afternoon so stay tuned for the finished look!
post signature

Friday, April 26, 2013

DIY Decorative Pillows--on the cheap!


Materials Needed:

1 standard bed pillow ($2.50 at Walmart)
Fabric (45x13 inches for one pillow)
Sewing machine

Start by cutting your standard bed pillow in half.  Look at all the batting in there!  I love thinking outside the box for materials.


Next, sew the open end of the pillow shut.  You'll need to stuff and squish the batting into the lining to do this.  Take your time and be sure to hold it shut with pins before you begin to sew.


 Now you have two nice little pillows!

On to the fabric cover.  If you are using a half of a standard pillow like I did, cut a fabric rectangle that is 13x45 inches long.  Fold each short end over twice and sew to create a 1/2 inch hem.  This finished end will be visible when the pillow case is finished.


Take the hemmed ends of the pillowcase and bring them together to overlap over each other in the middle.  Be sure that right sides are together.  It should measure 19 inches from end to end.  If it does not, adjust it until it does.  Also, be sure the hemmed ends are overlapping at least 2-3 inches.


Pin the unfinished edges together and sew.  DO NOT SEW the hemmed, overlapped edges together.  This is how you will get your pillow in and out of the case.


Turn the pillow case inside out and iron flat.


Insert the pillow into the case through the opening in the back...and tada!  You have a pillow with a handy removable case for easy washing.


The total cost for one of these pillows was about $3.50 if you include the fabric.  Compare this price to the following throw pillows I found at Target:


That's a whole lot of savings for pretty much the same results :).  I'm also planning on making some larger square pillows to go with these smaller ones on the couch.  

That's all for today! And now I'm off to enjoy my new pillows on the couch...

Friday, January 18, 2013

DIY Twig Wreath


The time has come to share with you one of my favorite diy projects that I've made for my home.  I started this project back in December, but didn't officially finish it until last Saturday--which is why you haven't seen it until now :).  Unfortunately, I don't have pictures of the step by step creation of the project, but the concept is simple.

So for awhile, I have been trying to find ways to spice up the look of our bathroom.  While it was clean and neat, it kind of looked drab and boring.  I had been keeping my eye out for an inexpensive project that would make it look "homier" (is that ok to say for a bathroom?).

I originally got my project idea from a fall wreath that caught my eye on Pinterest.  Isn't it just gorgeous?


If you go over to Yellow Mums, you can read a full tutorial (with beautiful step by step pictures) on how to create the twig base--and rolled flowers if you want to go that route!  

Like I said earlier, the idea is simple:
  1. Go on a walk and collect lots and lots of branches.  Devin was a great sport and trekked out to the woods with me to help carry them back.
  2. Snip your branches so that they are all approximately the same length.  WARNING: this part can be messy :).  My living room floor was a testimony to that!  You can play around with the lengths.  I like the look of having some shorter than others.  
  3. Cut a circular ring out of cardboard.  I used a heavy piece of cardboard from a box that I had lying around.  Mine was probably 8-9 inches in diameter from the outside edges.  The ring was probably 2-3 inches wide.
  4. Using a glue gun, glue the branches to the cardboard ring.  This part is fun! I had a blast fitting the branches together for the best look.  Almost like doing a puzzle!
  5. Embelish! Okay, so you want something to go around the middle of those branches--otherwise you'll have some ugly cardboard peeking through.  Not to mention it just looks...well, unfinished.  Back in December, when I completed the twig portion of this project, I wasn't sure what to put around the middle.  I considered fabric flowers like the ones above, but I didn't have any fabric on hand.  I did have some stems with tiny blue and white flowers on them that I had picked up at the dollar store awhile back.  The colors were perfect for our bathroom, so I glued them between some of the branches and called it good until I could come up with an alternate idea for those rolled fabric flowers.
Enter coffee filters.  Who knew they were GREAT for crafting flowers?  Being that we are coffee drinkers, I had plenty on hand! So last Saturday while we sat around relaxing and basically doing nothing but watching crime shows all afternoon, I perused the internet and to find a style of flower I liked.  Let me tell you--there are so many different kinds of coffee filter flowers! I finally settled on these:


Pretty, right? Two Shades of Pink has an excellent tutorial (video included) on how to make these.  I chose to keep my flowers white--partly because I was too lazy to try dying them, and partly because white really does match our bathroom.  

An hour and 45 coffee filters later.....ta da!


My only regret is gluing on the smaller flowers before I made the large ones.  I tried pulling them off, but alas I used too much glue.  If I could do it over again, I would put the large ones on first and then arrange the small ones so that they stick out further.  But anyways, overall I love it! It matches my blue and brown bathroom decor, and helps add some color and interest to my stark bathroom walls!

Cost of the entire project: $1 (what I paid for those small blue and white flowers)

Folks, its a winner!


Blissful and Domestic

Wednesday, November 28, 2012

DIY Canvas Sign


I seriously love subway art signs.  I think they are so fun and cute! A few weeks back I was browsing around on Pinterest (of course!) and etsy, when I came across this sign which I LOVED!

View this item in the owner's etsy shop

The saying is so true, and I loved the combination of small/large/print/cursive letters.  I knew I had to find a way to do this myself!  I had recently acquired a used canvas that someone was getting rid of and had saved it for such a time as this.  I also remembered a technique called "glue art" that I had read about here.  The glue art was interesting because it left a raised, textured look on the canvas.


After deciding on what I wanted, I gathered my materials.  Here is what I used:

  • Canvas
  • Pencil
  • Ruler
  • Elmer's Glue or Glue Gun
  • Acrylic Paint
  • Sponge or Paint Brush
To begin with, I carefully penciled the words onto the canvas, drawing lines with my ruler to keep the text straight.


Next, I slowly traced over the letters with Elmer's glue.  The trick here was to squeeze out the glue slowly and consistently so the line wouldn't "break."


I then set the canvas aside to dry.  Unfortunately, the Elmer's glue had a tendency to spread a little when it dried.  I really wanted those letters to be raised, so I ended up going over them again with a glue gun instead.  This technique worked much better, so I would recommend using a glue gun to begin with.


Once the letters were dry and I was satisfied with their height and texture, I painted over the entire canvas with acrylic paint and one of those sponge brushes.  Because the canvas had been previously painted, it took me 3 or 4 coats to cover it well.  The glue from the glue gun covered pretty well, but showed through in some places. I decided I liked it because it gives it a little bit of contrast.


And that is all folks! The entire project cost me $1.00--the cost of the paint and brush.  I love this sign and currently have it sitting on the floor against a wall in my living room.


What projects have you worked on lately?