Friday, November 30, 2012

Jar of Special Memories

I first saw the idea of keeping a memory jar online somewhere--although I can't for the life of me remember where it was!  I thought it was really neat and immediately decided to implement it myself.  I keep my memory jar on my dresser next to my bed.  I put valuable things in there.  Special memories I want to treasure for years to come.  Here it is:


Just a good ol' mason jar.

Once in a while I like to open up the jar and take out each thing.  It's fun to remember the events surrounding each item and the memories that it holds.  In my jar, I've kept...

...the bracelets Devin and I had to wear all week on our honeymoon at our resort...


..tickets from the museum at Gettysburg...


...a map of Philadelphia from the day we got engaged...


...and even a really old old old old ticket that I saved from a high school basketball game of Devin's I went to when I was 15 :)...


...yes I had a crush on him way back when I was 15 and saved this ticket.  I found it years later after we had started dating, haha!  

There are other things in my memory jar, but you get the idea.  I picture myself showing these things with my kids someday and sharing my special memories with them. 

How do you save special keepsakes?

25 Days of Christmas: Tomorrow!


Good morning friends! Don't forget to join me tomorrow for the start of the 25 Days of Christmas series on my blog!  You won't want to miss this chance to share with me and my readers what you have accomplished in your Christmas preparations.  I am eager to hear from you.  

I also have a surprise for you.... I'm going to be throwing in a giveaway on one of the 25 days!  Make that two! I will be hosting one here on my blog, and my friend from A Living Sacrifice will be hosting one for me on her blog as well.  You will be able to enter in one or both of these giveaways.  I'll be posting more details on this soon.  

I'm looking forward to sharing my Christmas with you and hearing about yours!

Thursday, November 29, 2012

A Few of My Favorite Winter Things


1. Snowy days

2. Fresh snow outlining each branch of every tree and bush

3. Snowmobiling with Devin

4. Drinking hot chocolate next to the Christmas tree

5. Scarves and boots

6. Baking

7. Snowmen--snowmen decorations are the cutest!

8. Heated car seats

9. Christmas lights on people's homes

10. Cozy nights inside with candles


What are some of your favorite winter things? Link up below and share them with us!


Wednesday, November 28, 2012

DIY Canvas Sign


I seriously love subway art signs.  I think they are so fun and cute! A few weeks back I was browsing around on Pinterest (of course!) and etsy, when I came across this sign which I LOVED!

View this item in the owner's etsy shop

The saying is so true, and I loved the combination of small/large/print/cursive letters.  I knew I had to find a way to do this myself!  I had recently acquired a used canvas that someone was getting rid of and had saved it for such a time as this.  I also remembered a technique called "glue art" that I had read about here.  The glue art was interesting because it left a raised, textured look on the canvas.


After deciding on what I wanted, I gathered my materials.  Here is what I used:

  • Canvas
  • Pencil
  • Ruler
  • Elmer's Glue or Glue Gun
  • Acrylic Paint
  • Sponge or Paint Brush
To begin with, I carefully penciled the words onto the canvas, drawing lines with my ruler to keep the text straight.


Next, I slowly traced over the letters with Elmer's glue.  The trick here was to squeeze out the glue slowly and consistently so the line wouldn't "break."


I then set the canvas aside to dry.  Unfortunately, the Elmer's glue had a tendency to spread a little when it dried.  I really wanted those letters to be raised, so I ended up going over them again with a glue gun instead.  This technique worked much better, so I would recommend using a glue gun to begin with.


Once the letters were dry and I was satisfied with their height and texture, I painted over the entire canvas with acrylic paint and one of those sponge brushes.  Because the canvas had been previously painted, it took me 3 or 4 coats to cover it well.  The glue from the glue gun covered pretty well, but showed through in some places. I decided I liked it because it gives it a little bit of contrast.


And that is all folks! The entire project cost me $1.00--the cost of the paint and brush.  I love this sign and currently have it sitting on the floor against a wall in my living room.


What projects have you worked on lately?


25 Days of Christmas


Beginning on December 1, join me here on my blog for a series titled "25 Days of Christmas."  Each day I will be blogging about something Christmas related--decorating, baking, snow, activities, gifts, diy projects, and more.

Link up with me each day to share your own Christmas preparations and accomplishments!

Tuesday, November 27, 2012

A Fireplace for Christmas

Wow! I can't believe Thanksgiving has come and gone! How did that happen? Devin and I spent a great week in Maine.  We were blessed with wonderful weather for travelling, almost NO traffic (I know--how'd we pull that off?), and a fun time with family and friends.  We topped it all off by setting up our Christmas tree and decorating it last night when we got home (more on this later!).  And best of all...woke up to find snow on the ground this morning! I'm thankful to the Lord for the many blessings and excitement of the holiday season.

On Wednesday morning last week, my mother in law and I decided to do our black Friday shopping two days early and hit up the local K-mart for some 6 a.m. door busters.  After being there for about 10 min. I remembered why I never shop at K-mart.  But yeah, anyways, I won't go into all of that.

Before we left, Devin decided he was feeling so productive that he was going to build a fireplace in his parents' living room.  He even said he'd even have it framed up before we got back from shopping in a couple hours.  Hmmm.  Good thought.

Unfortunately, about the only thing he finished before we got back from shopping was finding all the tools he needed which were scattered around the garage in undisclosed locations.  He was not happy to say the least.

We forgave him for not having it framed up, teased him, and then sat on the couch to watch him build.  (Probably not a great idea since we ended up changing the design on him two or three times haha!)

Well, he managed to stretch that two hour project into about 5 days...but hey, what can I say? My husband is pretty good at what he does! Here's what the finished product looks like:


Isn't it great? I just love all the white trim accenting the slate tile.  Not to mention the wonderful, orange extension chord in the corner  :).

So this was Devin's Thanksgiving project.  A beautiful, cozy fireplace finished just in time to hang some Christmas stockings from the mantel! I'm glad he's practicing up now so he can build one for me someday.


Chloe approves of the fireplace too :).  She's so cute!

So how was your Thanksgiving? What are you doing to prepare for Christmas?

Friday, November 16, 2012

My CVS Shopping Trip

I saved $24.66 at CVS today!! Here's what I bought:


1 box of Cinnamon Toast Crunch--normally $4.79, on sale this week for $1.97
Used a coupon for $0.50/1 Cinnamon Toast Crunch cereal

2 Colgate Max Clean--normally $3.79, on sale this week for $2.75 each
Used 2 $0.75/1 coupons, got 2 extra care bucks back for each--Making these FREE!

4 Progresso Soups--normally $3.19 each, on sale this week 4/$5.00
Used a coupon for $1/4

I had 9 extra care bucks to spend from my last shopping trip.  After coupon and extra care bucks, my entire purchase cost $0.47!!!!!  Plus, I have 4 extra care bucks to spend on my next trip.  Yay!

Tuesday, November 13, 2012

Celebrating and Savoring a Simple Christmas


Money Saving Mom is launching her new book Celebrating and Savoring a Simple Christmas.  Right now her book is just $0.99!! To purchase a copy, go here. 

You can also enter a giveaway to earn a free copy of Celebrating and Savoring a Simple Christmas. 

Money Saving Mom blogs about simple living and improving your home economy.  I highly recommend checking out her book!


Hats for the Boys

I finished the hats that I received orders for from the little boys at my church! They were so excited when they tried them on--and even more when they saw the cars on them.  Here's how they turned out:

Andrew requested a hat with blue in it:


Adam requested a red hat with a monster truck on it:


and Micah requested a blue hat:


These were so much fun to make! I will be listing these on my etsy shop for special order. Head on over and check them out if you'd like!  If you'd like to crochet a hat for yourself, check out my tutorial on how to crochet a basic hat.

What projects have you been working on lately?

How to Crochet a Basic Hat


The pattern that I use for crocheting my hats is simple and can be adjusted to fit any age or size.  You can head on over to my facebook page or my etsy shop to see some of the hats and other items that I've crocheted.  You also may have read about my hat crocheting frenzy here on Friday.  Later on I'll be updating you and sharing pictures on how the hats for the boys turned out!

Terms used in this pattern:
CH: chain
SC: single crochet
SLST: slip stich
INCR: increase

Yarn I use:
Red Heart Super Saver Economy--one skein yields approximately two hats depending on the size you make them.  Any yarn works well as long as its a medium weight.

Hook size:
I-9 (5.5 mm)

Directions:

Begin with a magic circle, CH 1. (If you have never worked with a magic circle, watch this tutorial to learn how)

SC 10 into the magic circle; pull circle closed, SLST to first SC; CH 1


From here, the hat is going to be worked in a pattern of increases and single stitches until we reach the desired size.  An increase is when you SC twice in the same stitch. The pattern is easy to remember if we assign a number to each row we crochet.

Row 1: INCR SC, INCR SC, INCR SC, until the end of the row
Row 2: INCR SC SC, INCR SC SC, INCR SC SC, until the end of the row
Row 3: INCR SC SC SC, INCR SC SC SC, INCR SC SC SC until the end of the row

Do you see how the row number controls how many SC we put between each increase?


In order to recognize when I've reached the end of a row, I use the place where I SLST my magic loop together as a point of reference.  The beginning/end of each row should line up with this spot.

You will continue to apply this pattern until the circle grows to the correct circumference for your hat. Here is  a size chart to guide you:


An easy way to measure the circumference of your circle is to count every three stitches as one inch.


When you are sure that your hat's circle is the correct circumference, SC in each stitch (NO INCREASES) until you reach the desired height (see chart above).

SLST to finish and tie off any loose ends.

And that's all there is to it folks!  You can add to this pattern by incorporating different colored stripes, pom poms, appliques, or stitching.

Enjoy creating!

Friday, November 9, 2012

Anne...and More Hats

 Lately I've been on quite the mission to crochet hats for every child in our church.  It all started with Anne.  Anne is the pastor's eight year old daughter who for some reason has taken a shine to my husband and me.  A couple of months ago, she started sitting with us during the Sunday evening service--adorable!  She'll walk into our pew, plop her Bible and purse down and smile really big at us through her braces.  Like I said, she is cute! One week she brought a nicely colored picture of a unicorn with "Ravens, I love you" written across the top.  Melts my heart :)

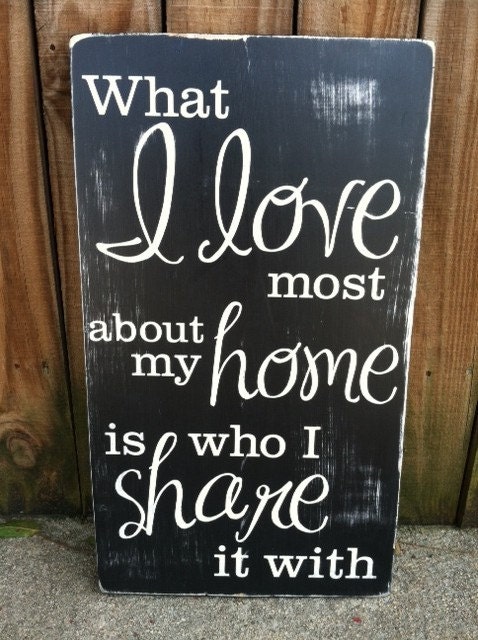
Anyways, I decided that I was going to crochet her a hat for being our "church buddy."  I made it in two shades of her favorite color (blue), added a flower accent, and embroidered her name on it.  Some of you may have seen it on my facebook page.

Here's what my finished product looked like:


I was so happy the day I gave it to her because I could tell she was IN LOVE!  It fit her perfectly, and she couldn't stop smiling.  The next week, she wrote me a thank you letter in which she stated that she "loved the hat" and also "loved my perfume because it's so nice." Her mom later told me that all week she had smelled her hat and said, "Oh, it smells so good like Mrs. Raven."  Haha!

Anne's hat caught the attention of the other tykes in our church.  Her sister quickly let me know that her favorite color was pink.  I think that was a hint :)  Last week I took her a newly finished pink puffy hat with blue accents and a blue pompom.  Sadly, I did not take a picture of Erin's hat :(

As Erin was trying on her new pink hat, i looked up to see three little boys standing around me.  Andrew (Anne and Erin's INSANELY CUTE little 4 year old brother) wanted to know "Did you finish my hat yet, Mrs. Raven?" Micah and Adam (brothers from a different family) were hilarious.  "Wow, those hats look really  nice and warm, Mrs. Raven," they said.  Their huge, blue eyes pleading for me to suggest making them hats as well.

So my orders are in for next Sunday:
Andrew would like a hat that has blue in it with a car on it,
Micah would like a blue hat,
and Adam would like a red hat with a monster truck on it!

To be honest, I didn't think I would be able to do the whole car and monster truck thing.  I even told them I wasn't going to be able to put pictures on their hats.  However, this week I did some research and found out that its totally possible to crochet a car and a monster truck.  I can't wait to surprise them with this on Sunday!

We are so blessed to be a  part of a church that is filled with children.  There is something about the way that a child looks up to you, loves you, and wants to be like you that is so sweet.  I'm thankful that I can use my hats to love them back.

Come back tomorrow to see pictures of the boys' finished hats and also to learn


Tuesday, November 6, 2012

Learning to Coupon

I've made up my mind to learn how to effectively coupon.  I could definitely use the money I hope to save and plus...it seems fun! I admire those women who can come out of a store with more money in their pocket then when they arrived. Seriously..how do they do that?  I'm going to find out so I can do it myself :).

I've fiddled around with coupons before.  It's never been a highly organized nor consistent system.  It usually ends up being one or two random coupons here or there.  However, I was inspired by my pastor's wife who recently offered to give me a few pointers on couponing.  She was the one who introduced me to Money Saving Mom--a wonderful woman who blogs about frugal living.  On her blog you will find ideas for saving and making money, being organized, living frugally, and couponing.  I've enjoyed perusing through her website and gaining some background knowledge on this "couponing science."

This week, I had my first coupon transactions where I actually saved a decent amount of money.  I am so excited about them that I just feel the need to share.

Last Saturday, I stopped in at Weis where they were having cereal sale: buy 4 boxes of Kelloggs cereal for $8.00.  I had a couple of $1/2 coupons which I paired with this sale. The best part--a free gallon of milk when you purchase 4 boxes of cereal! I walked out of the store with all of this for only $6.00!

Then, yesterday, I carefully read up on the coupon/deal match ups going on at CVS and ventured out to try it for myself.  I stopped at the counter and requested an Extra Care Card before I started shopping so that I could earn those Extra Care Bucks :).  I won't go into all the tiny details, but I left the store with 4 Glade candles, 2 deodorants, and a trial size John Freida shampoo and conditioner -all for $5.00 after Extra Care Bucks.  Sweet!

Now that I've gotten a taste for how fun this can be, I'm excited to expand and try my hand at it some more. I look forward to sharing more of my "savings" experiences with you soon!

How about you? Do you like couponing? Have you gotten any great deals this week?